| |
| |
|
 |
| |
|
|
|
| |
 |
 |
|
|
| |
| |
|
In this issue:
1. Guest Spot: LSF9 'loadusers' Utility for Batch User Creation
2. Lawson Design Studio, Part 7: It Takes a Wizard
3. Worthwhile Reading
4. Lawson Tips & Tricks
|
|
|
|
| |
| |
 |
|
|
| |
|
|
|
 |
June 2007
|
|
|
| |
|
|
|
| |
The LawsonGuru Letter is a free periodic newsletter providing provocative commentary on issues important to the Lawson Software community. The LawsonGuru Letter is published by—and is solely the opinion of—John Henley of Decision Analytics.
Visit Decision Analytics at https://www.danalytics.com. For subscription information, see the bottom of this message.
| |
|
|
Thank You Absolute! |
 |
Before we begin this month's issue, I want to take a moment to thank our friends at Absolute. About six months ago, Absolute's COO Kent Jacobson noticed that the LawsonGuru.com site was a little slow, and I shared some frustrations I was having with the hosting provider. To make a long story short, Kent offered to host LawsonGuru.com in Absolute's Data Center. I'd keep providing the content--like Lawson Tips & Tricks, ERDs/Data Dictionary, and the LawsonGuru.com Forums. And, Absolute would provide the hardware / connectivity. Needless to say, it was a perfect solution!
This is another great example of a commitment that both Absolute and I share--that of giving back to the Lawson community. So, every time you visit LawsonGuru.com, remember the generosity of our friends at Absolute!
|
Lawson® is a registered trademark of Lawson Software, Inc. The LawsonGuru Letter is neither affiliated with nor sponsored by Lawson Software, Inc. Lawson Software, Inc. is not responsible for the content of this information.
|
|
|
| |
|
|
|
| |
1. Guest Spot: LSF9 'loadusers' Utility for Batch User Creation |
|
|
| |
by Alex Wolff, New Breed Corp.
When it comes to adding new users to Lawson, it is a tedious and time-consuming process, involving 3 steps as outlined below:
• Add User at the OS Level
• Add User to Resource Manager and Set Attributes
• Tweak LAUA settings (Still required for 9.0.0.x)
Add User at the OS level
With UNIX you need to run the ‘useradd’ command. For 10 users or 100 users it is a pretty trivial exercise to create a UNIX script that can run the ‘useradd’ command within a loop for each user in a text file. I am sure it as easy on W2K3 as well.
Add User to Resource Manager
Adding users to Resource Manager and setting their attributes can be quite mind-numbing. At the very least you need to set the following attributes for each user:
• SSOPID
• OSID
• OSPassword
• Full Name
• First Name
• Last Name
• Check LS
• Group(s)
• Role(s)
• ProductLine
• Portal Role
• E-mail
• Custom Attribute(s)
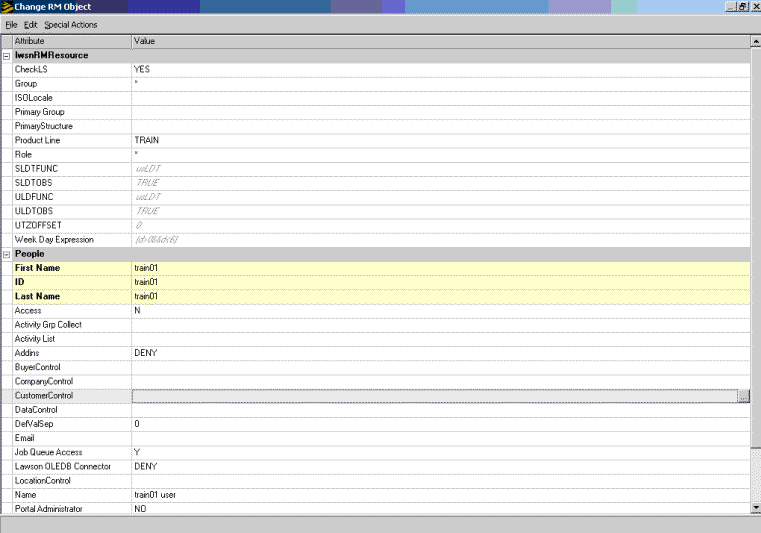
Fig 1. Lawson’s “Change RM Object” screen for setting Lawson and Custom attributes.
loadusers to the Rescue!
Wouldn’t it be nice if Lawson provided a quick and easy way to mass add or change Users and their attributes? Actually, Lawson does; it is called the “loadusers” utility. Loadusers utility is a shell command that takes XML formatted data and uploads it into Resource Manager/LDAP and GEN. The utility itself is easy to run; just specify the following options and your done:
-f xmlfile
-p defaultProductline
-d defaultDomain (Windows Only)
The rest of this article goes into the details of the XML file format and shows sample JAVA code that can be used as methods to generate an XML file from a pipe-delimited text file.
XML file format
The general format for the XML file to be used with loadusers utility is shown in figure 2 below.
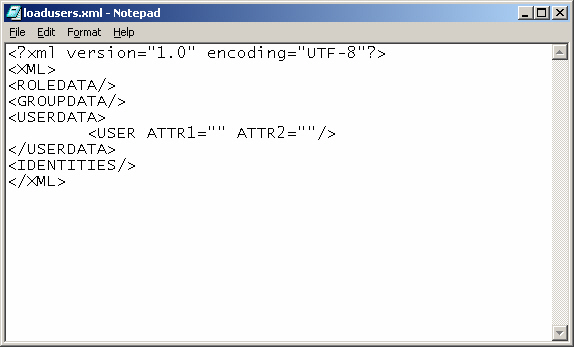
Figure2. Sample XML file to be used with ‘loadusers’ utility
XML File Format for loadusers
Notice the ROLEDATA, GROUPDATA, IDENTITIES nodes? Those nodes hint at the fact that you can use the loadusers utility to add new ROLES, GROUPS, and IDENTITIES but I will not discuss those options here. I will just be concentrating on the node and child node of <USERDATA>.
Note: For a full explanation of the loadusers utility please refer to Chapter 15 in the “Lawson Administration: Resources and Security” manual (LSRDAG-90UWA-05).
There is one <USERDATA> node per file but there can be multiple <USER> nodes one for each user you want to upload. Attributes in Resource Manager translate into Node Attributes in the XML file as shown above. If you have defined custom attributes via Lawson’s Schema Editor then you can include them in the XML file as well. In my example above we have one custom attribute called “DataControl” used to store data we use to write security rules with.
The loadusers utility will parse and load attributes that can contain multiple values such as “Role” and “Group” if they are separated by a comma. One caveat though: With our version of the loadusers utility I was not able to load custom attribute data that contained multiple values (i.e. DataControl=”30100,30200,40500”). The record containing the multi-valued custom attribute would error out as shown below:
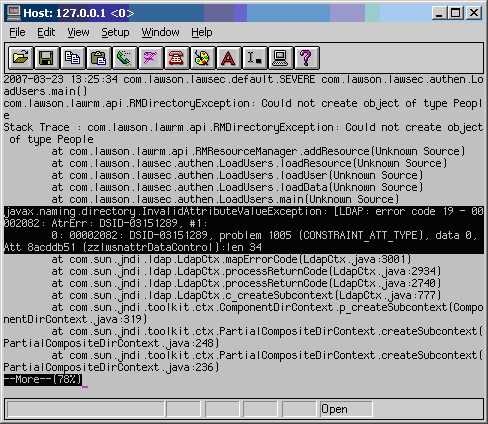
Figure 3. This is what happens when you try to load multi-valued custom attribute data. Lawson, can you please fix?
Creating the XML file
Creating the XML file in an efficient manner is the challenge. You could manually create the file but that would defeat the purpose. You need to create a utility that can read a simple input file and transform it to the XML format required by loadusers utility. There are dozens of language choices here, most modern languages like Perl, Java, VB have the constructs to create XML files that adhere to the Document Object Model (DOM) standard.
I chose to use JAVA since it has numerous classes to build DOM compliant document structures. I could easily have used Perl along with their XML::DOM package but I’ve made the switch to JAVA and I’ll never go back. VB/VB.net would also be an appropriate choice here and it could easily be integrated with Excel for the basic user data entry.
My source file for the user data would come from Excel via a pipe-delimited file. This would allow anybody to input the data using a well-known and understood GUI environment.
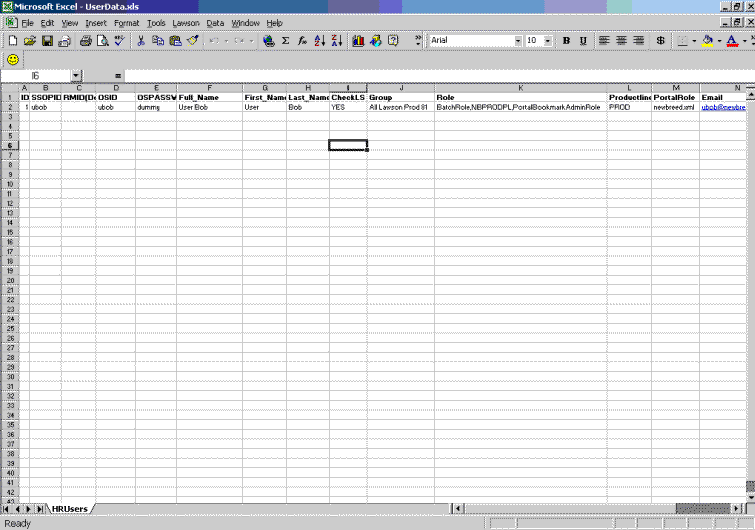
Figure 4. Sample Excel template for adding User Data.
The JAVA program would then read the file, process each record with id = 1, and create a <USER> node with each column becoming an Attribute. (Id’s 2 through 4 are used when I want to batch load ROLES, GROUPS or IDENTITIES.)
The resulting XML file is shown below:
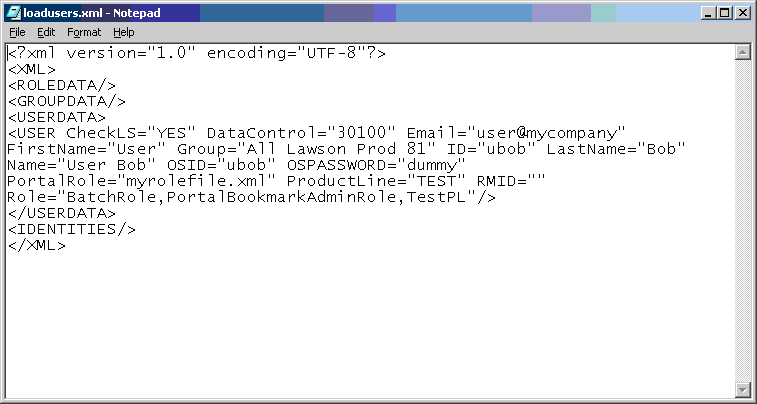
Figure 5. A properly formatted XML document ready for’ loadusers’ utility.
At this point to actually add the user(s) to Lawson Security all you have to do is run the 'loadusers' utility:
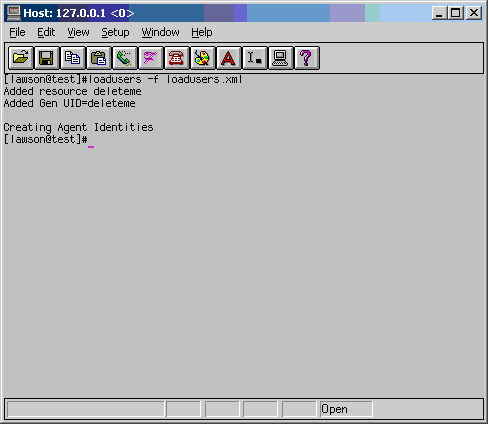
Figure 6. Screenshot showing good outcome of running ‘loadusers’ utility.
Java Code Snippet
As with all my articles I like to include some code that can be used as a starting point for your own use. The below code snippet is a section of a simple JAVA program that converts the Pipe delimited data to XML. The main purpose of the code is to show you how easy it is to add Nodes, Child-Nodes and Attributes to create an XML document. Please be aware that I make no guarantees it will work with your system’s JAVA version and I will accept no liability for any code you develop based on this Article that may damage your Lawson ERP System.
| |
BufferedReader in = new BufferedReader(new FileReader(tmpin));
DocumentBuilderFactory dbf = DocumentBuilderFactory.newInstance();
DocumentBuilder db = dbf.newDocumentBuilder();
Document domdoc = db.newDocument();
DOMSource inputdoc = new DOMSource(domdoc);
Element Root = domdoc.createElement("XML"); /*Create element and append
domdoc.appendChild(Root);
Element RoleData = domdoc.createElement("ROLEDATA"); /*Create element and append
Root.appendChild(RoleData);
Element GroupData = domdoc.createElement("GROUPDATA"); /*Create element and append
Root.appendChild(GroupData);
Element UserData = domdoc.createElement("USERDATA"); /*Create element and append
Root.appendChild(UserData);
Element Identities = domdoc.createElement("IDENTITIES"); /*Create element and append
Root.appendChild(Identities);
while ((s = in.readLine()) != null) /*loop to read each line of a pipe-delimited file and stick it into an array
{
myArr = s.split("\\|");
try
{
i = Integer.parseInt(myArr[0].toString());
}
catch(Exception ex)
{
i = 9;
System.out.println(i);
}
switch (i) /* Depending on the ID call method then add element
{
case 1:
Element User = domdoc.createElement("USER");
User = UserAdd(myArr , User); /* Method UserAdd() shown below
UserData.appendChild(User);
break;
case 2:
Element Role = domdoc.createElement("ROLE");
Role = RoleAdd(myArr, Role); /*Method RoleAdd() not shown
RoleData.appendChild(Role);
break;
case 3:
Element Group = domdoc.createElement("GROUP");
Group = GroupAdd(myArr, Group); /*Method GroupAdd() not shown
GroupData.appendChild(Group);
break;
case 4:
Element Identity = domdoc.createElement("IDENTITY");
Identity = IdentitiesAdd(myArr, Identity); /*Method IdentitiesAdd() not shown
Identities.appendChild(Identity);
break;
default:
break;
}
}
public static Element UserAdd(String[] ArrIn, Element UserIn) /*Method to create attributes for <USER> node
{
UserIn.setAttribute("ID", ArrIn[1]);
UserIn.setAttribute("RMID", ArrIn[2]);
UserIn.setAttribute("OSID", ArrIn[3]);
UserIn.setAttribute("OSPASSWORD", ArrIn[4]);
UserIn.setAttribute("Name", ArrIn[5]);
UserIn.setAttribute("FirstName", ArrIn[6]);
UserIn.setAttribute("LastName", ArrIn[7]);
UserIn.setAttribute("CheckLS", ArrIn[8]);
UserIn.setAttribute("Group", ArrIn[9]);
UserIn.setAttribute("Role", ArrIn[10]);
UserIn.setAttribute("ProductLine", ArrIn[11]);
UserIn.setAttribute("PortalRole", ArrIn[12]);
UserIn.setAttribute("Email", ArrIn[13]);
try
{
UserIn.setAttribute("DataControl", ArrIn[14]);
}
catch(Exception ex)
{
UserIn.setAttribute("DataControl", "");
}
return UserIn;
} |
|
|
|
|
| |
|
|
|
| |
2. Lawson Design Studio, Part 7: It Takes a Wizard |
|
|
| |
|
|
|
| |
This installment of our article series on Lawson Design Studio focuses on the Wizard Designer component. Wizard Designer is definitely the least-used component of Lawson Design Studio; I can honestly say that I haven't met many clients who have actually used it!
Why Use a Wizard?
Design Studio's Wizard Designer is certainly not as robust a tool for building training content as Lawson’s new Learning Accelerator product offering. But Wizard Designer can be useful for training or documenting processes. Wizard Designer allows you to create and deploy step-by-step versions of occasionally-used Lawson forms (e.g., yearly functions) or perhaps to build training guides for new Lawson users.
In this article, we’ll explore building a quick form using the Wizard Designer.
Again, as with previous articles in this series, a few caveats:
- Demonstrating a product and its features via a static article is impossible. I do gloss over some steps in this article. My intention is to show you the highlights hopefully whet your appetite and imagination.
- This is not a replacement for Lawson’s documentation; as such, this article is not a re-hash of ‘this is a menu bar, this is the toolbox”, etc. etc.. If you want more detail, read the documentation and consider attending a Lawson-provided training.
- Design Studio isn’t perfect; remember that it is a browser application. It can’t do everything and it does hang, but not as much as it used to. If you’re just starting out with it, you will achieve a certain level of frustration—I guarantee it.
What Does It Do?
Simply put, Design Studio’s Wizard Designer gives you the capability to create a step-by-step progression thru a Lawson form by:
- Controlling the user’s navigation through the fields on the form (including switching tabs/related pages!)
- Setting a default action after a particular field is entered
- Branching in different ways based on the values on the form (e.g., you might want certain to prompt the user to enter certain fields on a AP10 Vendor form depending on the Vendor Class)
Accessing Design Studio
Lawson Design Studio—like Lawson Portal—is a browser-based application. It is an add-on product (i.e. you have to be licensed for it, and install it separately from Lawson Portal). So, if you have Design Studio, enter the URL to access it:
Env 8: http://<lawson web server>/lawson/portal/studio
LSF9: http://<lawson web server>/lawson/studio
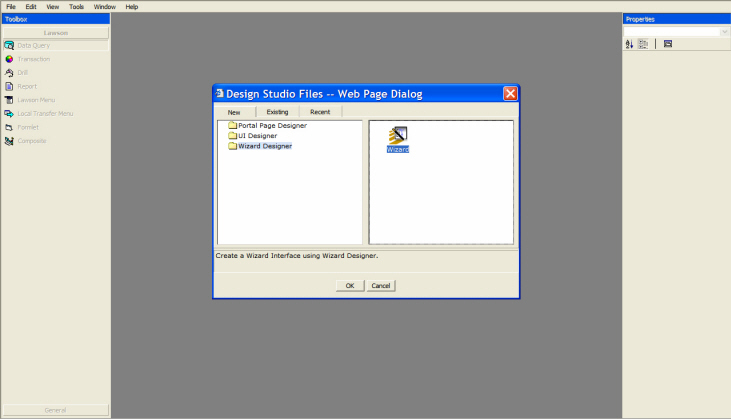
Once you log in, click ‘File|New’ on the Menu bar, select the ‘New’ tab, choose the Wizard Designer, and double-click on the Wizard icon:
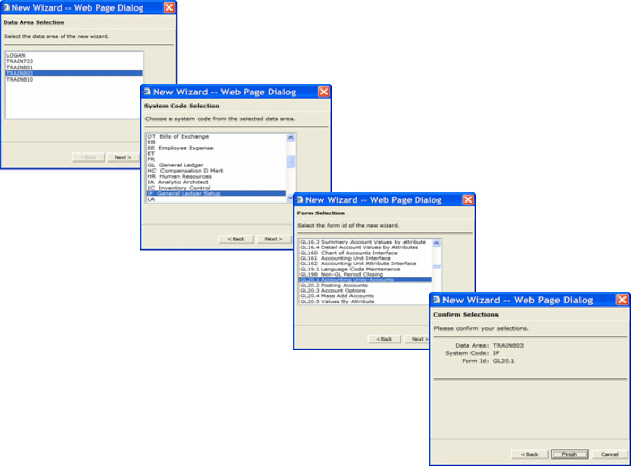
This starts the ‘New Wizard’ (Do you think Lawson was tempted to call it the “New Wizard Wizard”?), which is used to select the form upon which to build the wizard. As with the other Design Studio wizards, select your desired product line, system code, and application form:
You'll then have an empty wizard framework, with a starting and ending point:
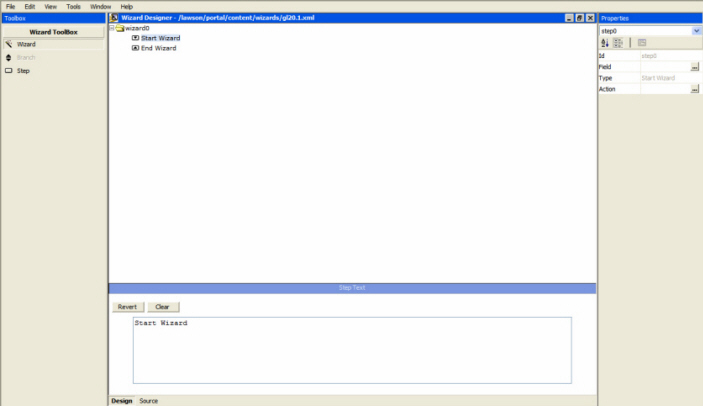
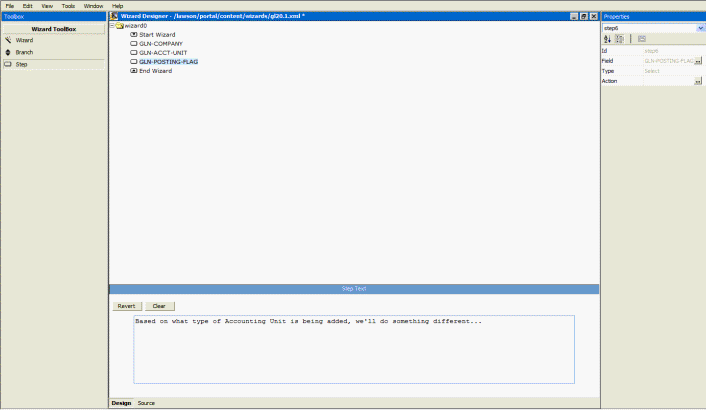
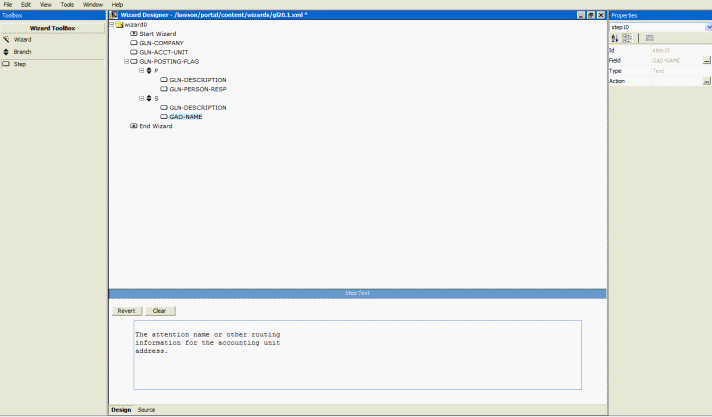
The first thing I’m going to do is change the ‘help text’ that will display when the Wizard is invoked:
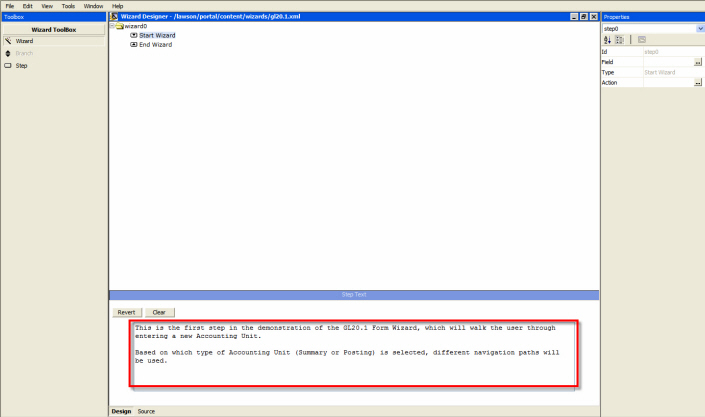
To add steps to the wizard, you double-click the step icon, and select which field to which the step should be linked:
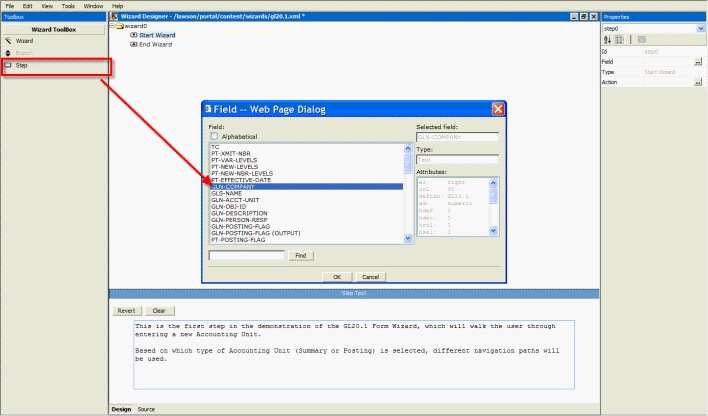
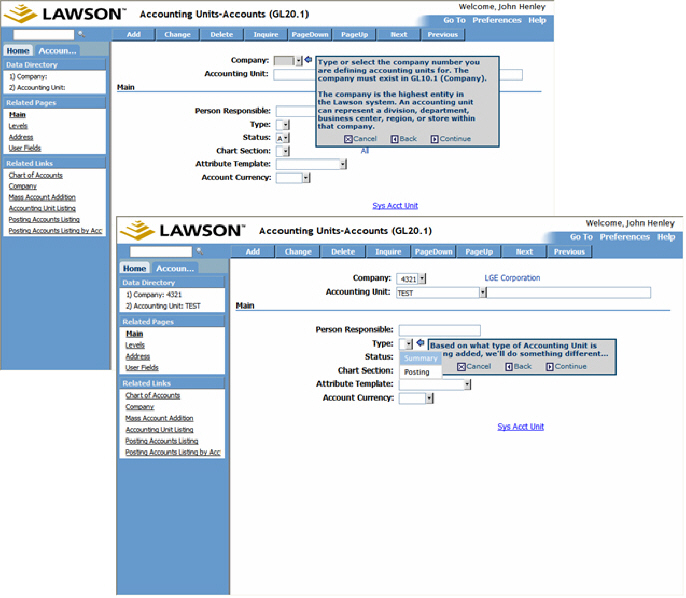
In this example, I’m building a wizard for adding a new Accounting Unit, so the first field the user should be positioned on is the Company. In the text pane at the bottom, you can see the default Lawson-supplied “field help” for the fields as they are added. You can leave the default help text, or you can create your own, tailored to your organization.
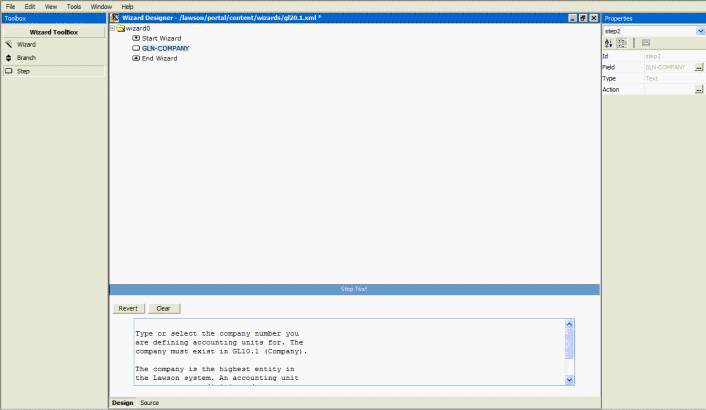
Next I add the Accounting Unit and Posting Flag:
Then, we add some branching logic to the wizard, based on which type of Accounting Unit is being added, Posting or Summary. To do that, double-click the ‘branch’ icon, and enter the value to be used to decide the branch:
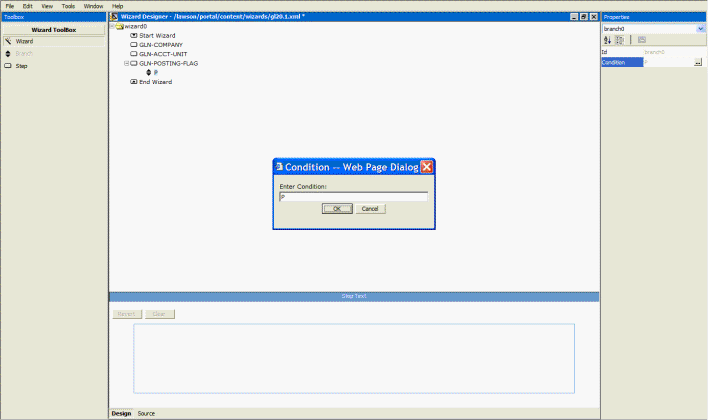
We’re adding two branches: one for Posting and one for Summary:
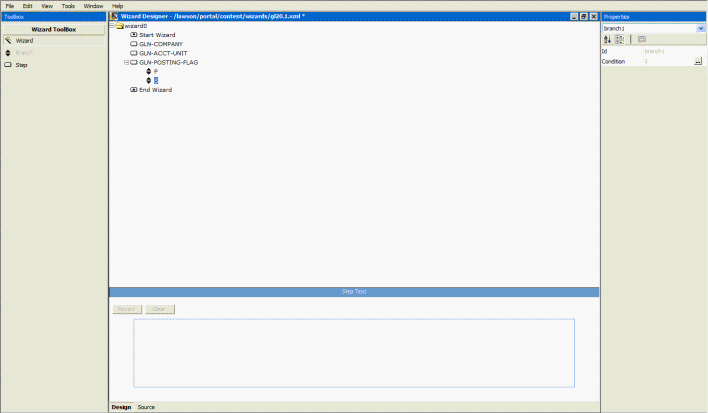
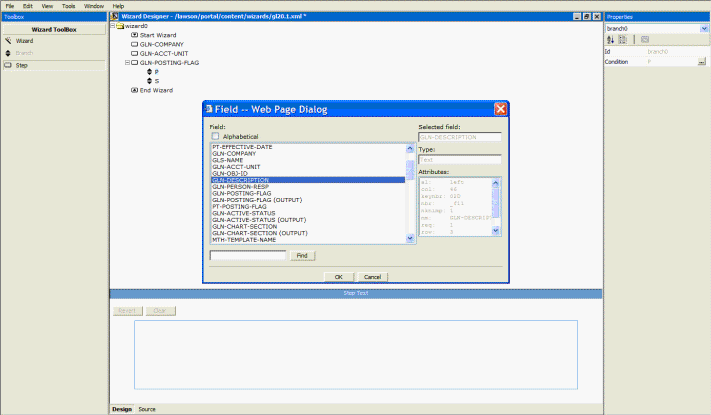
If this is a Posting Accounting Unit, we’ll do take the user to the Person responsible and Description fields; for Summary A/U, to Description and Contact Name (which will automatically switch the user to the 'Address' tab/related page). Not a very robust wizard, but hey, it's just an example!
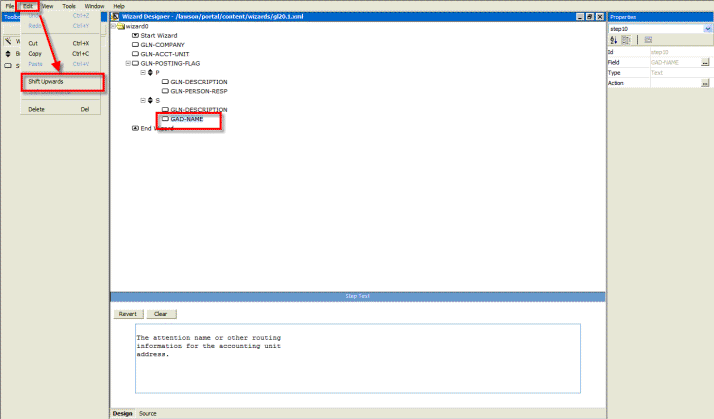
Rearranging
If you need to re-order the steps, select the one to be moved and then Edit | Shift Upwards / Shift Downwards:
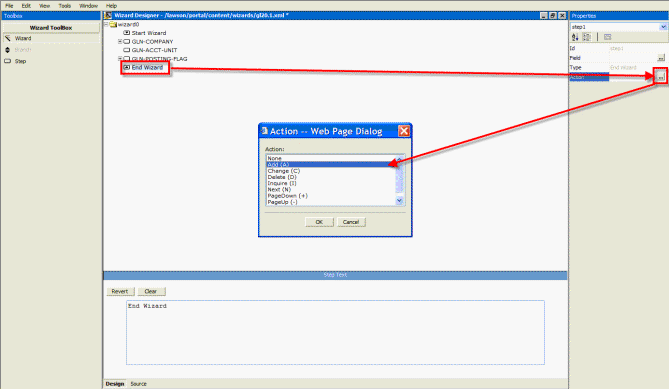
Enhancing the Wizard
An additional thing you can do is to invoke an action when a particular step is reached; I'm going to default an 'Add' action when the wizard ends. Obviously in this contrived example, the wizard hasn't walked the user through all of the required fields on the form, so the ‘Add’ action will fail, but you get the idea:
Saving Your Work
Remember to save your work frequently--after all this is a browser application:
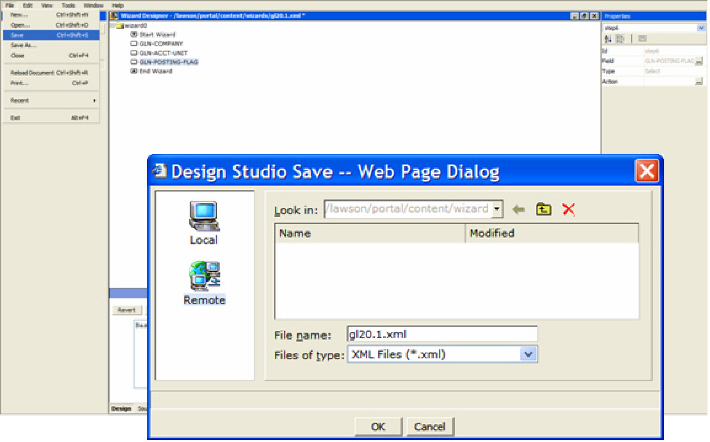
Note that Wizard forms are saved in a different directory (/lawson/portal/content/wizard) than Form Designer forms (/lawson/portal/content/forms).
A quick refresher: Remember that Design Studio really shows two menu bars. It takes some adjustment; Design Studio has its own menu bar, which displays underneath the browser’s menu bar:

On countless occasions, I’ve dropped-down the “wrong” ‘File’ menu and tried to save a Lawson Design Studio .xml file using the browser’s menu bar!
Testing your new Wizard Form
Use the ‘View | Preview’ menu option to preview your work (remember, it’s a “live” form!):
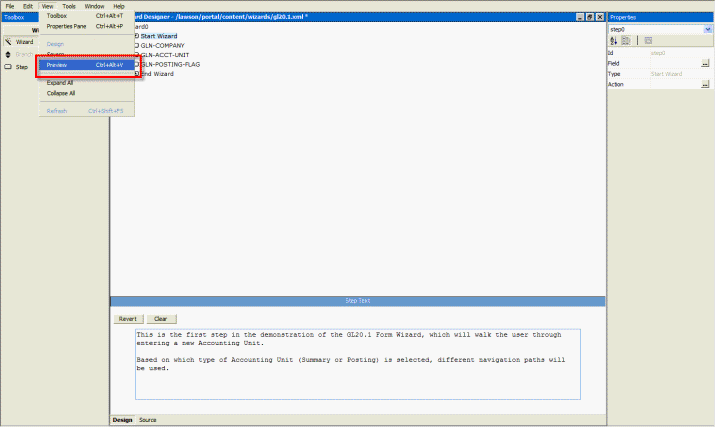
The Wizard displays as a dialog box, with a ‘cancel’ and ‘continue’ options for starting the Wizard.
Notice the “help text” that I entered is displayed:
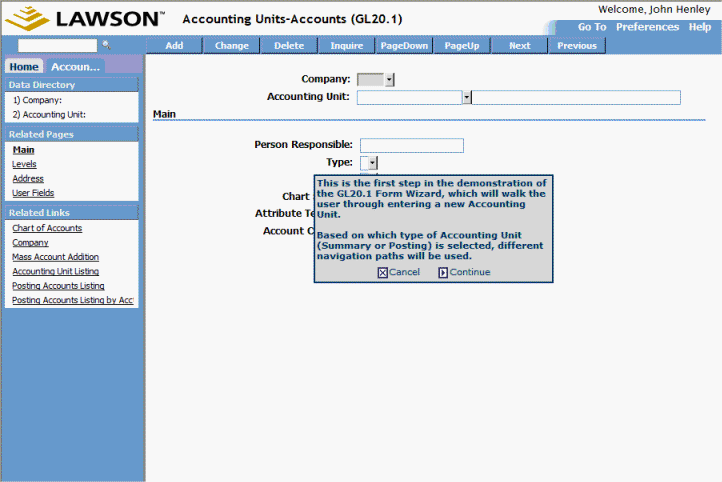
As you continue through each step in the wizard, the dialog boxes change and you are positioned in the appropriate data field:
|
|
|
| |
|
|
|
| |
3. Worthwhile Reading |
|
|
| |
|
|
|
| |
With Disparate Applications Galore, Oracle Touts Integration
- QUOTE OF THE ISSUE –
“The trouble with programmers is
that you can never tell what a
programmer is doing until it's too late.”
-- Seymour Cray
New Application Integration Architecture makes it easier to
connect acquired product lines.
Information Week, April 23, 2007
http://www.informationweek.com/story/showArticle.jhtml?articleID=199200280
Ripping up the Rules of Management
Meet Business 2.0 Magazine's contrarians, 11 business leaders
who achieved success by zigging while the rest of the world zagged.
Business 2.0, May 2007
http://money.cnn.com/galleries/2007/biz2/0705/gallery.contrarians.biz2/index.html
Case study: A new approach to integrating architectures post-merger at Lawson
In this age of mergers and acquisitions, a common problem faced by solution architects is the integration of product lines in a manner that provides a consistent user experience.
InfoQ.com, May 21, 2007
http://www.infoq.com/articles/lawson-casestudy
Amid Challenges, SAP CEO Kagermann Sticks To His Plan
Technology, business models, and leadership are in flux.
Information Week, April 30, 2007
http://www.informationweek.com/story/showArticle.jhtml?articleID=199202333
|
|
|
| |
|
|
|
| |
4. Lawson Tips & Tricks |
|
|
| |
Share your Tips & Tricks. Send them to mailto:letter-tips@lawsonguru.com.
You can view other Tips & Tricks on LawsonGuru.com.
How does Lawson store "NULL" Dates?
When Lawson creates database tables to store data, columns are always defined as NOT NULL. For date columns, this means that an "empty" date must be stored somehow. However the various third-party databases do not support 00/00/0000 as valid dates. So Lawson converts 00/00/0000 to the "earliest" date supported by the various databases:
| "Native" / lafile |
00/00/0000 |
| DB2 |
01/01/1800 |
| iSeries |
01/01/0001 |
| Informix |
12/31/1899 |
| Oracle |
01/01/1700 |
| Sybase |
1/1/1753 |
| SQL Server |
1/1/1753 |
This is important to understand when you need to use date selection using a third-party tool, such as Crystal Reports, using the native database as the data source.
|
|
|
| |
|
|
|
| |
© Copyright 2007, Decision Analytics. All rights reserved. |
|
|
|
| Please share The LawsonGuru Letter in whole or in part as long as copyright and attribution are always included.
Lawson® is a registered trademark of Lawson Software, Inc.
The LawsonGuru Letter is neither affiliated with nor sponsored by Lawson Software, Inc.
Lawson Software, Inc. is not responsible for the content of this information.
|
| |
|
Decision Analytics is an independent consultancy, focusing on Lawson technical projects, and specializing in reporting, customization/modification, data conversion, and integration/interfaces. Please visit https://www.danalytics.com for more information.
|
|